

All 48 Essential Barre Chords for Guitar – Free Printable PDF Chart
- Rodrigo Moreira
- Mar 17, 2025
- 11 min read
Updated: Jun 3, 2025
TABLE OF CONTENTS (Click to jump) |
Hi everyone, Rodrigo here again!
In today’s article, I’ll show you what I consider the most fundamental and essential barre chords every guitarist should learn. These shapes are a game-changer, allowing you to play chords all over the neck and unlock countless new songs. We’ll start with an overview of how to read chord diagrams, then I’ll introduce you to the Essential Barre Chords for Guitar Chart—a must-know resource for any guitarist looking to expand their chord vocabulary. To wrap things up, I’ll answer some of the most common questions about mastering barre chords.
Barre chords can be challenging at first, so if you're still struggling, I recommend that you start by building a strong foundation with open chords. My article Basic Guitar Chords Chart: 25 Chords for Beginners will help you get comfortable with essential chord shapes before tackling barre chords. And if you're into rock and nu-metal and want to learn power chords, don’t miss Learn 24 Power Chords for Beginners: A Must-Have Chart for Rock & Nu-Metal.
If you’re new here, I also have a 16-part series on music theory applied to guitar, covering everything from the basics to advanced concepts. You can explore these topics by clicking the links below or visiting the blog section in the top menu:
Simples Intervals -> Compound Intervals -> Triads -> Drop-2 Chords -> Drop-3 Chords -> Shell Chords & Extensions -> Triads & Extensions -> Chord Melody -> Guitar Arpeggios -> Guitar Scales -> Major Keys -> Minor Keys -> Harmonic Minor Keys -> Melodic Minor Keys -> Greek Modes -> Chord Progressions
Hope you enjoy the lesson!
How to Read Guitar Chord Diagrams
How to Read Vertical Lines in Chord Diagrams
At first glance, chord diagrams might remind you of an Excel spreadsheet, but instead of numbers and formulas, they show you exactly where to place your fingers on the guitar neck to play a chord.
Understanding the Vertical Lines
Take a look at a chord diagram, and you'll see six vertical lines. Each one represents a string on your guitar:
The line on the far right corresponds to the thinnest string (1st string).
The line on the far left corresponds to the thickest string (6th string).

Chord Diagrams Vertical Lines
This order stays the same whether you're right- or left-handed.
String Numbers and Names
To make things even clearer, guitar strings are numbered from 1 to 6, starting from the thinnest (1st string) and ending with the thickest (6th string). Here’s a quick rundown of their names:
1st string – E (high E)
2nd string – B
3rd string – G
4th string – D
5th string – A
6th string – E (low E)

Chord Diagrams with Strings' Names
Since the 1st and 6th strings share the same name, we use “high” and “low” to differentiate them—"high E" because it produces a higher pitch and "low E" because it has a lower pitch.
Understanding these string names and numbers is key because this is how guitar instructors communicate. If you hear, "Place your index finger on the B string" or "Move your ring finger from the 1st string to the 3rd string," you’ll know exactly where to go.
How to Read Horizontal Lines in Chord Diagrams
Now, let's talk about the horizontal lines in a chord diagram. These lines represent the thin metal bars on your guitar neck, known as frets. That’s why you might hear the term "fretboard"—it’s simply the neck of the guitar, divided by these frets.

Understanding the Frets
The spaces between the frets are where you'll place your fingers to play notes and chords.
Most chord diagrams start from the 1st fret and cover up to the 4th or 5th fret because that’s where the most common chord shapes are found.
But sometimes, a song will require you to play chords higher up the neck. In that case, the diagram will indicate the starting fret, like this:

In this example, the top horizontal line represents the 5th fret, meaning the next lines correspond to the 6th, 7th, and 8th frets.
Finger Position
The black dots on a chord diagram show you exactly where to place your fingers on the fretboard. Let’s take a look at one of the most common guitar chords: E minor (Em).

In this diagram, you’ll see just two black dots, which means you only need two fingers to play it:
One finger goes on the 2nd space of the D string (4th string).
The other goes on the 2nd space of the A string (5th string).
Now, let’s check out another example—the A minor (Am) chord.

This time, there are three black dots, meaning we’ll use three fingers:
One finger on the 1st space of the B string (2nd string).
One on the 2nd space of the G string (3rd string).
One on the 2nd space of the D string (4th string).
At this point, you might be wondering: "Which fingers should I use for each note?" We’ll get to that in just a second! But first, there’s something important we need to clear up.
A Quick Note on Frets
Earlier, I mentioned that the frets are the thin metal bars on the guitar neck. That’s true! But in everyday guitar talk, the term “fret” is often used to refer to the spaces between those metal bars.
So instead of saying, “Place your finger on the 2nd space of the D string,” we simply say: “Place your finger on the 2nd fret of the D string.”
It means the same thing, but from now on, we’ll use "fret" as a synonym for "space" to keep things simple and consistent.
What Finger Should I Use for Each Note?
Most chord diagrams you’ll find are similar to the ones I just showed you—they often don’t indicate which fingers to use. Many instructors believe that chord fingering is intuitive and that students will naturally find a way to play them. However, I believe this approach can be risky for students.
Not all fingers have the same strength, and certain finger placements can put unnecessary strain on the wrist, potentially leading to long-term injuries. Poor fingering choices can also make learning slower and more frustrating, which may discourage students from practicing.
That said, some chord diagrams do include fingering instructions. These may use numbers inside the dots to indicate which finger to use:
1 = Index finger
2 = Middle finger
3 = Ring finger
4 = Pinky finger

A minor Chord Diagram with Correct Finger Position
Alternatively, some diagrams use letter abbreviations:
I = Index finger
M = Middle finger
R = Ring finger
P = Pinky finger

A minor Chord Diagram with Correct Finger Position
Using the correct fingering from the start will help you develop good technique, play more efficiently, and avoid unnecessary strain.
Barre Chord Symbols
Barre chords are a type of chord shape where one finger is used to press down multiple strings at the same time. Because they can be challenging to master, they often lead to frustration for many students.
If you’re just starting out on guitar, I highly recommend reading my article "How to Play Guitar: A Beginner’s Guide to Success!" It covers essential techniques that will help you develop an efficient playing style—and trust me, your future self will thank you!
Now, when it comes to barre chord diagrams, the barre is represented by a thick horizontal black line, typically played with the index finger. However, in some cases, barre chords can also be played using the ring or even the middle finger, depending on the chord shape and musical context.


How Do I Know Which Strings to Strum?
Now that we’ve covered everything related to your fretting hand and how to find each chord note, let’s talk about which strings you should strum for each chord—and which ones you should avoid.
What Does “X” Mean in Guitar Chords?
The “X” symbol, located between the chord diagram and the chord name, indicates which strings should not be played.
In the Am chord diagram below, you’ll see an “X” above the low E string. This means you should avoid or mute that string when strumming the chord.
A minor Chord Diagram In the D chord diagram, there are two “X” marks—one above the low E string and another above the A string. This means both of these strings should be avoided or muted when strumming the chord.
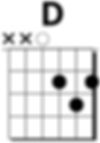
D major Chord Diagram In the Em chord diagram, there are no “X” marks. This means you should strum all the strings when playing this chord.
E minor Chord Diagram
What Does “O” Mean in Guitar Chords?
The “O” symbol, also located between the chord diagram and the chord name, represents an open string. An open string is one that is played without pressing any fingers on the fretboard—but it still needs to be strummed because it’s part of the chord.
For example, in the Am chord diagram, the “O” above the high e string means that you should strum that string along with the other strings where your fingers are placed. The only string to be avoided is the low E string.
Essential Major Barre Chords Chart for Guitar
Just so you know, I have my own way of writing chord diagrams, which differs slightly from the conventional format because I believe it makes things clearer for beginners. In my diagrams, I number every fret, highlight the “X” with a red circle to make it stand out, and use letters to indicate the correct fingering for better guidance.

Click on the chart to expand and download the Essential Major Barre Chords Chart for Guitar or use the link below to download the PDF directly.

Essential Minor Barre Chords Chart for Guitar
Click on the chart to expand and download the Essential Minor Barre Chords Chart for Guitar or use the link below to download the PDF directly.

The Best Order to Learn Guitar Chords
If you're having trouble learning chords—especially switching between them—I’ve written a detailed post that walks you through the exact order in which to learn them. It explains which chords connect easily due to similar finger positions, how to go beyond the 25 essential chords mentioned here, and even how to play simplified versions of barre chords so you can play almost any song without needing a capo.
Check it out here: "Every Chord You Should Learn in Order".
FAQ
Are There Easier Barre Chords to Start With?
Yes! Before tackling full barre chords, try these easier alternatives.
The F major chord variation, F/C, is a great starting point. It has the same shape as the standard F major barre chord (the first chord from the chart above), but we’ll avoid both the low and high E strings. This makes it more approachable while still being a fully moveable chord—you can shift it up the neck to play any major chord.

Despite using fewer strings, this chord isn’t necessarily "simpler." The challenge is muting the two unused strings. To mute the high E string, let the fleshy part of your index finger lightly touch it. For the low E string, use your thumb to gently mute it. Even if muting feels tricky at first, this shape is much easier than a full barre and helps build the strength needed for barre chords. I always recommend my students start with this shape since it allows them to play many songs while gradually developing the technique required for barre chords.
For minor chords, try Bbm/F instead of the standard Bbm (the first chord in the second chart). The same muting principles apply, but for this one, mute the low E and A strings using your thumb—that’s it!

Are There Exercises to Help with Barre Chords?
A great way to improve your barre chords is by adapting songs or chord progressions you already know to be played entirely with barre chords. For example, take a simple progression like C | F | G | C. If you play C and G as open chords, you’ll have to make a big jump between the open C major chord, the F major barre chord, and back to the open G major chord.
While switching between open and barre chords is useful in the long run, when you're still developing your barre chord technique, try playing all these chords as barre chords instead. Using just one shape, you can play C major as a barre chord on the 8th fret, move down to F major on the 1st fret, and then to G major on the 3rd fret. Since they all share the same shape, you only need to shift your hand up and down the fretboard rather than changing your grip.
What are some common barre chord shapes I should know?
If you look at the major barre chord chart above, there are basically two shapes for playing all barre chords: one with the lowest note on the low E string and another with the lowest note on the A string. The same applies to minor barre chords. So, there are basically four shapes to learn.
Why do my barre chords sound muted or buzzy?
This is a common issue caused by improper finger placement, insufficient finger strength, or uneven pressure. Fixes:
Ensure your index finger is close to the fret (but not on top of it).
Use the bony side of your index finger rather than the fleshy part.
Keep your thumb directly behind the neck, not too high or too low.
Apply pressure gradually—don’t squeeze too hard or you’ll tire out quickly.
Can I play barre chords with small hands?
This is a common question I get all the time, and the answer is yes! The size of your hands or fingers has no direct impact on your ability to play guitar. While a smaller guitar might feel more comfortable if you have small hands, it’s not a necessity—you can easily find videos of young kids playing full-sized guitars effortlessly.
On the other hand, one of the greatest guitarists of all time, Tal Farlow, had such large hands that people nicknamed him "The Octopus." Yet, his hand size didn’t define his ability—it was his technique and dedication.
So, don’t worry about hand size! With proper technique and practice, anyone can master barre chords.
Do barre chords work on acoustic guitars?
Yes, but they are harder because of thicker strings and higher action.
Why does my hand hurt when playing barre chords?
Hand fatigue can happen if you’re:
Pressing too hard – Use just enough pressure for a clean sound.
Holding the chord for too long – Take breaks and shake out your hand.
Tensing up – Keep your wrist relaxed and slightly curved.
Using bad thumb placement – Keep it behind the neck, not wrapped around the top.
Do barre chords get easier over time?
Yes! They’re tough at first, but with consistent practice, your fingers will adapt. If you keep at it for a few weeks, you’ll notice significant improvement.
How long does it take to master barre chords?
The time varies for each individual, but with consistent daily practice, many guitarists see significant improvement in their barre chord technique within a few months.
Are there alternatives to barre chords?
Yes! One option is using a capo, which allows you to play entire songs using familiar open chord shapes while changing the key effortlessly.
Can I avoid barre chords altogether?
Same. You can use a capo.
How can I switch between barre chords faster?
Like I said before, try to play entire songs or chord progressions using only barre chords.
Wishing you all the best on your musical journey! Looking forward to seeing you here again soon!