

GUITAR ARPEGGIOS
- Rodrigo Moreira

- May 2, 2023
- 18 min read
Updated: Apr 14, 2025
TABLE OF CONTENTS (Click to jump) |
Greetings!
Rodrigo here, and it's a pleasure to have you back with me again!
Today, we'll be exploring an intriguing topic that's sure to pique the interest of all guitar aficionados, particularly those who enjoy improvising and soloing. We'll be taking an in-depth look at arpeggios, a versatile technique that not only enables you to create rapid passages but also helps you to identify the critical notes of each chord and create more captivating melodies.
Before we get started, I'd like to remind you that all of the content I've shared on this blog so far is in chronological order. To get the most out of this post, it's essential to have a solid grasp of some key concepts such as Simple Intervals, Triads, and 7th-chords. If you need to review any of this material, you can easily do so by clicking on the corresponding topic. So, are you ready? Let's dive into the world of arpeggios together!
Simples Intervals -> Compound Intervals -> Triads -> Drop-2 Chords -> Drop-3 Chords -> Shell Chords & Extensions -> Triads & Extensions -> Chord Melody -> Guitar Arpeggios -> Guitar Scales -> Major Keys -> Minor Keys -> Harmonic Minor Keys -> Melodic Minor Keys -> Greek Modes -> Chord Progressions
Also, if you found my content informative and valuable, leave a comment with your feedback at the bottom of this page. Your input is very important to me, and I appreciate any insights you can provide. Thank you for your support and let’s get to work!
TRIADS (3-STRING, 2-STRING, 1-STRING)
In music theory, a triad is a chord made up of three notes that are stacked in thirds, meaning that the interval between each note is a third (either a minor third or a major third). The three notes that make up a triad are usually referred to as the root, third, and fifth.
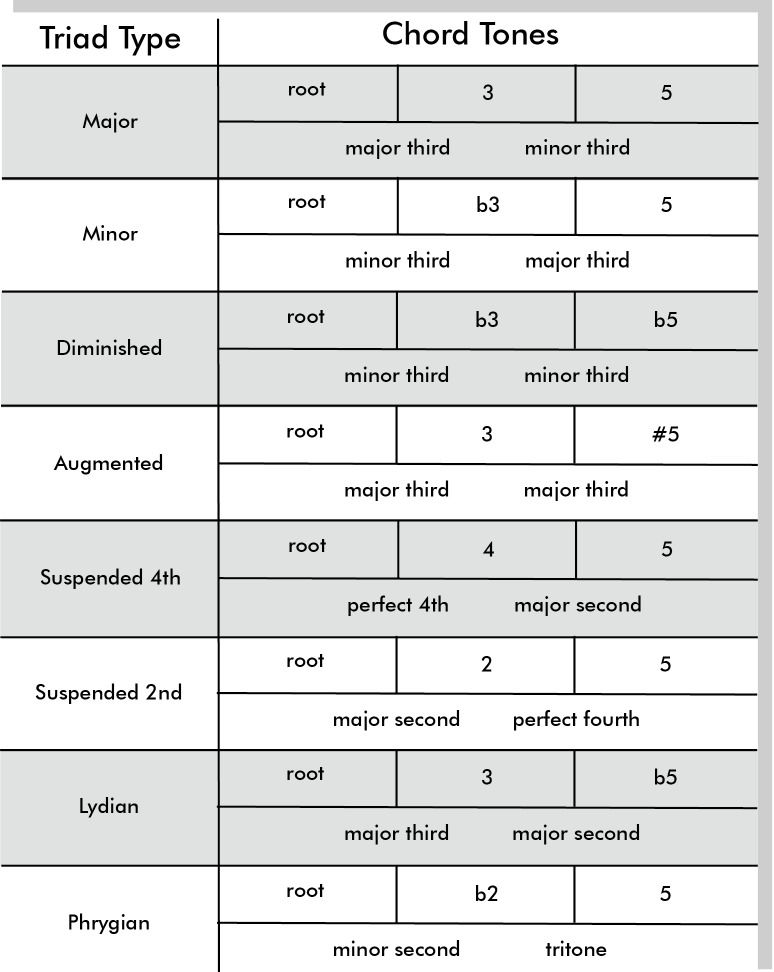
The most common types of triads are major, minor, augmented, and diminished. A major triad consists of a root note, a major third (two whole-tones above the root), and a perfect fifth (three and a half tones above the root). A minor triad consists of a root note, a minor third (one and a half tone above the root), and a perfect fifth. An augmented triad consists of a root note, a major third, and an augmented fifth (three whole-tones above the root). A diminished triad consists of a root note, a minor third, and a diminished fifth (three whole-tones above the root).
If you've read my previous article on "Triads," you're probably aware that there are several other types of triads besides the four standard ones. These include suspended 2nd, suspended 4th, Lydian, and Phrygian triads. While I won't be diving into those specific triads in this article, it's important to note that once you've mastered the process of playing arpeggios perfectly, you'll have the tools to tackle any other type of triad you choose. So, let's focus on finding the most efficient way to play arpeggios first, and you'll be well on your way to mastering all the different types of triads out there.
When it comes to playing triads on the guitar's fretboard, there are three main ways to arrange them. Since triads consist of three notes, those notes can be placed on three different strings, two different strings, or even just one string. It's essential to master all three of these formats in order to freely navigate the guitar's fretboard.
3-STRING TRIAD
Let's start with 3-string triads, which we previously covered in a few articles ago. As we did in that article, we'll organize the triads and their inversions both horizontally and vertically. For example, let's take a look at the C major triad and its inversions:
HORIZONTAL
[C major triad and its inversions on the higher strings]

[C major triad and its inversions on the mid-higher strings]

[C major triad and its inversions on the mid-lower strings]

[C major triad and its inversions on the lower strings]

VERTICAL
[C major triad starting from the 2nd-inversion]

[C major triad starting from the root-position]

[C major triad starting from the 1st-inversion]

If you haven't already, I highly recommend practicing these triads back and forth, up and down the fretboard until you have them memorized. This will help you prepare for upcoming exercises where we'll be mixing these triads with other formats to find the most efficient way to play arpeggios. So, take your time and really focus on nailing down these triads before moving on to the next step. Trust me, it will pay off in the long run.
2-STRING TRIAD
Another way to arrange triad notes on the guitar fretboard is by placing two of them on the same string and the remaining one on the string below: (2,1) format, or vice versa where we place one note on a string and the other two notes on the string right below it: (1,2) format. The format we'll choose to play the triads depends on the finger we use to start it. It's important to note that most of the time, we can only start playing triads or arpeggios using three different fingers: the index, middle, and pinky finger. The only exception to this rule is when playing diminished triads, diminished 7th, and minor 7(b5) arpeggios, where we often use the ring finger instead of the middle finger. So, keep these finger placements in mind as we explore different triad formats and arpeggio exercises.
[C major triad root-position in the (1,2) format]

[C major triad root-position in the (2,1) format]

[C major triad 1st-inversion in the (1,2) format]

[C major triad 1st-inversion in the (2,1) format]

[C major triad 2nd-inversion in the (1,2) format]

[C major triad 2nd-inversion in the (2,1) format]

Student: So, no matter the set of strings I play these 2-string triads, they’ll always have the same “shape”? Because the examples above were given using the low E and A strings. What if I play them on the A and D strings? Will they look the same?
Rodrigo: Yes! They’ll always look the same, with only one exception. When we play them using the G and B strings.
When playing 2-string triads, the same fingering will apply regardless of which set of strings you choose, with one exception. Due to the tuning differences between the G and B strings, the fingering for these strings will be slightly altered. However, the good news is that you only need to memorize the root-position fingering. This will become clear once we start combining these triads and exploring their relationships on the fretboard. So, focus on mastering the root-position of these 2-string triads, and the rest will fall into place.
Student: Got it! I remember that from the first lesson.
Rodrigo: Great! This is how they'll look like:
[C major triad root-position in the (1,2) format on the G and B strings]

[C major triad root-position in the (2,1) format on the G and B strings]

1-STRING TRIAD
Don't underestimate the importance of arranging triads on a single string. While it may not seem very useful at first glance, this format will help you connect the same triads in different regions of the fretboard, which is essential for becoming a great improviser. However, don't just memorize the format by itself - the most important thing to remember is the distance or interval between each note of the triad. Using the C major triad as an example, remember that the distance from the root to the major third is two whole-tones, from the major third to the perfect fifth is one and a half tone, and from the perfect fifth to the next root is two and a half tones. It's crucial to memorize this sequence backwards as well, so you can play the triads in reverse order. By mastering these triad formats and understanding their intervals, you'll be able to create fluid, seamless transitions and progressions in your playing.
[C major triad on the high e string]

[C major triad on the B string]

[C major triad on the G string]

[C major triad on the A string]

[C major triad on the A string]

[C major triad on the low E string]

GUITAR TRIADIC ARPEGGIOS (STARTING FROM DIFFERENT FINGERS)
It's important to understand the difference between chords and arpeggios. Chords are a group of notes that are played together simultaneously, while arpeggios are chords in which the notes are played individually, one after the other. The reason why we're exploring all of these different chord formats is to find the most efficient way to visualize and play arpeggios on the guitar fretboard. Although there are many other possibilities for organizing these triads, I highly recommend that you learn this process first and spend ample time working on it. Once you've mastered this approach, feel free to experiment and find your own way to organize the triads. By developing your own unique approach, you'll be able to play arpeggios with greater ease and creativity.
Arpeggio starting with the pinky finger
To begin with, we need to organize the triads vertically so that the lowest note of the first triad played is the same as the highest note of the last triad played. Let's use the C major triad as an example again and organize its inversions in a way that follows this rule. Take a look at the image below and note that the lowest note of the first triad is C, and the highest note of the last triad is also C. Our goal is to connect these notes from the low E string to the high e string:
[C major triad and its inversions crossing the 6 strings]

As you play these triads in sequence, you'll notice that two notes are retained from the previous chord and one new note is added in the next. The challenge now is to play each note of the arpeggio without repeating any of them, and we'll end up with a two-octave C major arpeggio:
[2-octave C major arpeggio]

This arpeggio can also be thought of as the 3-string C major triad in root-position, the C major triad in the (1,2) format, and the C on top to complete the second octave. Take a look at the image below:
[2-octave C major arpeggio]

It's important to establish a way to play this arpeggio where you don't have to move your hand to another position. Since the notes of this arpeggio spans from the 5th to the 8th fret, we should start with the pinky finger and end with the same finger. Then, the index finger is used for the 5th fret, the middle finger for the 6th fret (when playing minor arpeggios), the ring finger for the 7th fret, and the pinky for the 8th fret.
Student: Do I really have to go through all this process of finding all the triads to finally get to the corresponding arpeggio? Or can I just memorize the final result?
Rodrigo: I mean, of course you can, but you’d be using a “shortcut” rather than actually learning where the arpeggio comes from. It might look a little abstract to you right now, but when you start improvising your solos over songs, you’ll understand how important it is to be able to build the chords you’re soloing over at any part of the fretboard. The soloing part is as important as learning the chords behind it and these two topics should be practiced together.
Arpeggio starting with the middle finger
In addition to the previous example, we can also reorganize the same set of triads in a different way. The image below shows the C major triad and its inversions crossing the six strings in a new pattern.
[C major triad and its inversions crossing the 6 strings]

Applying the same principle of not repeating any note, we can create a two-octave C major arpeggio that covers the same fretboard area as the triads. This time, the arpeggio spans from the 7th to the 10th fret, so we start it with the middle finger to ensure that each finger falls under a different fret. Here's the resulting arpeggio:
[2-octave C major arpeggio]

This arpeggio could also be thought of as the C major triad in the (1,2) format, the 3-string C major triad in the root-position, and the C on top to complete the second octave. Take a look at the image below:
[2-octave C major arpeggio]

Arpeggio starting with the index finger
As we continue to explore different ways of organizing the C major triads, we come across yet another variation:
[C major triad and its inversions crossing the 6 strings]

Following the same rule of not repeating any note, we can construct a two-octave C major arpeggio that covers the same fretboard area as the triads. This arpeggio spans from the 8th to the 12th fret and is played with the index finger on the first note to ensure that each finger falls under a different fret. Take a look at the resulting arpeggio:
[2-octave C major arpeggio]

This arpeggio can also be thought of as the C major triad in the (2,1) format, followed by the 3-string C major triad in the root-position, and the C note on top to complete the second octave. See the image below for a visual representation:
[2-octave C major arpeggio]

Diagonal arpeggio with index finger
Connecting different regions of the fretboard is essential for guitar players, and one way to achieve this is by mastering the diagonal arpeggio. This particular arpeggio is crucial because it allows us to transition smoothly from low-pitched notes to higher ones, which is often required in a guitar solos melody. By incorporating the diagonal arpeggio into your playing, you can create fluid and dynamic guitar solos that cover the entire range of the fretboard. Let's take a look at how to construct this essential arpeggio.
[C major triad and its inversions crossing the 6 strings diagonally]

The diagonal arpeggio is an extension of the 2-octave arpeggio we just discussed. It usually covers three octaves or a little less than that and allows you to seamlessly connect different areas of the fretboard when soloing. However, to play the last three notes, you'll need to shift your hand position. Start the arpeggio with your index finger on the 8th fret and play the notes in sequence. When you reach the last C on the B string, reposition your hand so that you can play it with your middle finger. This way, you'll be able to smoothly move from low to high notes without any interruption.
[C major diagonal arpeggio]

This arpeggio can also be thought of as the C major triad in the (2,1) format, followed by the C major triad in the (1,2) format, and again by the (1,2) format. See the image below for a visual representation:
[C major diagonal arpeggio]

There's another diagonal arpeggio that's crucial to master, and we'll cover it shortly after going over the arpeggio inversions.
To fully explore the fretboard, it is crucial to practice the same arpeggios starting from their other chord tones, such as the third and fifth.
TRIADIC ARPEGGIOS INVERSIONS
1st-Inversion Arpeggio (index finger)
We will apply the same process to this arpeggio as we did to the previous ones. To illustrate, let's take the C major triad and use its 1st inversion, C/E, as the starting point. We will then connect triads until we find the triad shape that contains the E note as its highest note on the high e string:
[C major triad and its inversions crossing the 6 strings]

Displayed below is the 1st-inversion of the C major arpeggio, covering the same fretboard area as the previously discussed triads:
[2-octave C/E arpeggio]

The following image shows the exact same arpeggio played one octave below:
[2-octave C/E arpeggio]

This arpeggio can also be thought of as the C/E triad in the (2,1) format, followed by the 3-string C/E, and the E on top to complete the second octave. See the image below for a visual representation:
[2-octave C/E arpeggio]

2nd-Inversion Arpeggio (middle finger)
Similar to the previous arpeggios, we can apply the same approach to this one. For instance, we can start with the 2nd-inversion of the C major triad, which is C/G, and then connect triads until we locate the one that has G as its highest note on the high e string. See the image below for an illustration of this approach using the C major triads:
[C major triad and its inversions crossing the 6 strings]

Below is an illustration of the 2nd-inversion of the C major arpeggio, which covers the same area of the fretboard as the triads above.
[2-octave C/G arpeggio]

This arpeggio can also be thought of as the 3-string C/G triad, followed by another 3-string C/G triad, and the G on top to complete the second octave. See the image below for a visual representation:
[2-octave C/G arpeggio]

Diagonal arpeggio with middle finger
To expand our knowledge of C major triads, we will now take the previously discussed C/G and extend it to the following area of the fretboard. In order to achieve this, the following image displays the C major triads arranged in a way that allows us to cover 2 different areas:
[C major triad and its inversions crossing the 6 strings diagonally]

Displayed below is a diagonal arpeggio that covers the same region of the fretboard as the triads above.
[C/G major diagonal arpeggio]

CONNECTING DIFFERENT REGIONS OF THE FRETBOARD WITH TRIADIC ARPEGGIOS
To fully explore the fretboard, you can combine the arpeggios we've covered so far into a single exercise. The image below demonstrates how to do this with C major triads, spanning the entire fretboard from open strings up to the 15th fret:
[C major arpeggios throughout the whole fretboard]

Keep in mind that the example shown covers only part of the fretboard, but as you move past the 12th fret, the notes begin to repeat. By continuing the same process, you can expand the exercise to cover the entire fretboard. Student: Okay, let me check if I actually understood it. So, in the very beginning of the example, that E (fret 0) in the first measure, going all the way up to the E (fret 0) on the 1st string, is the 1st-inversion “C/E arpeggio” going upwards, right?
Rodrigo: Correct!
Student: And then followed by that, we have a G (fret 3, first string) going all the way down to another G on the low E string. That’s the 2nd-inversion “C/G arpeggio” played downwards?
Rodrigo: Correct again!
Student: And for the 4th and 5th measures, we basically have the diagonal arpeggio with the middle finger going all the way up.
Rodrigo: Yup!
Student: Cool! Doesn’t seem to be that hard. So, for the 6th and 7th measure we just have a regular C major arpeggio with the middle finger being played downwards?
Rodrigo: Keep going.
Student: Followed by that we have the diagonal arpeggio with middle finger and finally the 1st-inversion arpeggio, C/E, one more time?
Rodrigo: You got it!
The exercises discussed earlier in this post are crucial to achieving fluency on your instrument, particularly the two diagonal exercises. Despite the seemingly overwhelming number of possibilities, it's important to practice a little bit every day. As you progress, you'll find it easier to navigate from one region of the fretboard to another. These arpeggios are the key to connecting any scales you may study in the future. Therefore, no matter how much time and effort it takes to master these arpeggios, the investment will pay off.
ARPEGGIOS FROM THE "A" STRING
So far, we have primarily focused on arpeggios that start from the low E string, which is a common approach for many guitarists. However, it's important to note that you can also use the same arpeggios starting from the A string. In fact, many guitarists prefer this approach, as it allows them to keep the A string as their reference point.
Below is an image of the "1st-Inversion Arpeggio," starting on the C note located on the A string:
[C major arpeggio starting from the A string with pinky finger]

The following image illustrates the "2nd-Inversion Arpeggio," starting on the C note located on the A string:
[C major arpeggio starting from the A string with middle finger]

The following image illustrates the "Diagonal arpeggio with middle finger," starting on the C note located on the A string:
[Diagonal arpeggio with middle finger]

These arpeggios are the same ones we studied before, but with some notes removed to illustrate how you can also approach them from the perspective of the A string as your reference point.
OTHER TRIADS
In this article, we have covered a lot of ground regarding arpeggios. However, there are still many more possibilities to explore that we couldn't cover in this one article alone. After practicing and becoming proficient in the C major arpeggios we have presented here, it's time to try them out in other keys (C, Db, D, Eb, E, F, Gb, G, Ab, A, Bb, and B.) Once you feel comfortable with major arpeggios, the remaining arpeggios should be much easier to learn since only a few notes need to be changed to alter the quality of the arpeggio. For instance, to create minor arpeggios, simply flatten the third (E becomes Eb); to create diminished arpeggios, flatten both the third and the fifth (E becomes Eb and G becomes Gb); to create an augmented triad, sharpen the fifth (G becomes G#). For information on all the other possible triads, refer to my article on "Triads". Keep practicing and exploring these arpeggios, and you'll be amazed at how much more fluent and confident you'll become on the guitar.
Rodrigo: Sure thing.
TABLE OF TRIADS
GUITAR 7TH-ARPEGGIOS
Assuming that you already understand the distinction between triads and 7th-chords, we will now move on to using the same arpeggios format that we previously used for the triads, but this time with the addition of the seventh degree to create 7th-arpeggios. In all the examples that follow, we will be using the Cmaj7 arpeggio as an example, and I will provide suggestions for practicing these arpeggios in a similar manner to the triad arpeggios. If you’re struggling with the concept of 7th-chords, I strongly recommend that you read my article on “Drop-2 chords”.
Arpeggio starting with the pinky finger
[2-octave Cmaj7 arpeggio]

Arpeggio starting with the middle finger
[2-octave Cmaj7 arpeggio]

Arpeggio starting with the index finger
[2-octave Cmaj7 arpeggio]

Diagonal arpeggio with index finger
[Cmaj7 diagonal arpeggio]

7TH-ARPEGGIOS INVERSIONS
1st-Inversion Arpeggio (index finger)
[2-octave Cmaj7/E arpeggio]

2nd-Inversion Arpeggio (middle finger)
[2-octave Cmaj7/G arpeggio]

Student: Since the 7th-arpeggios have one extra note, shouldn’t we have one more inversion to work on? Like a “3rd-inversion arpeggio”?
Rodrigo: Not really. Both the major and minor sevenths are placed very close to the root so the arpeggio would be the same as the root-position.
Diagonal arpeggio with middle finger
[Cmaj7/G diagonal arpeggio]

CONNECTING DIFFERENT REGIONS
[Cmaj7 arpeggios throughout the whole fretboard]

7TH-ARPEGGIOS FROM THE "A" STRING
[Cmaj7 arpeggio starting from the A string with pinky finger]

[Cmaj7 arpeggio starting from the A string with middle finger]

[Diagonal Cmaj7 arpeggio with middle finger]

OTHER 7TH-ARPEGGIOS
Assuming you've already read my articles on "Drop-2 chords" and "Drop-3 chords", you probably know that there are 13 different types of 7th-chords, each with its own corresponding 7th-arpeggio (maj7, min7, dom7, min7(b5), dim7, min(maj7), 7sus4, maj7(#5), maj7(b5), dom7(#5), dom7(b7), maj6, and min6). The process for creating these arpeggios is the same as with the triads - identify the difference between each type of chord and adjust the arpeggio accordingly. For example, to create the C7 arpeggio, we take the C major triad and add a minor 7th by replacing the major 7th (B) with a Bb.
Practice all 13 types of 7th-arpeggios in every key, taking your time and working a little bit every day. It's a long journey, and sometimes you may feel like you're not improving, but your brain is still processing the information and becoming more familiar with the position of each chord. Don't get discouraged and be patient and kind to yourself. With practice, you'll eventually be able to play arpeggios and chords all over the fretboard with ease.
Rodrigo: Here’s the table of 7th-chords in case you need it as well.
Student: Thanks!
TABLE OF 7TH-CHORDS

HOW TO PRACTICE GUITAR ARPEGGIOS?
In the following sections, you'll find original materials I’ve developed based on nearly two decades of experience teaching musicians of all levels—from beginners to professionals. These exercises have proven to be highly effective, helping many of my students refine their skills, and I hope they will do the same for you on your musical journey. If you have any questions, feel free to reach out to me at info@guitartheorylessons.com.
Appendix of 7th-Arpeggios (TABS + Standard Notation)
If you're looking to expand your knowledge of arpeggios and unlock the full potential of your fretboard, the Appendix of 7th-Arpeggios is an essential resource for you. This comprehensive digital download provides everything you need to master 7th arpeggios in all 12 keys, covering one, two, and three-octave patterns.
What’s Inside?
You’ll receive a 445-page PDF Sheet Music + TAB, ensuring you have the tools necessary to develop fluency in arpeggios across the entire fretboard. The Appendix of 7th-Arpeggios includes a detailed breakdown of all the essential 7th arpeggios, giving you a complete roadmap to improve your improvisation, composition, and overall technique.
The Arpeggios Covered:
This guide features all types of 7th arpeggios in every key, including:
Major 7th (Maj7)
Minor 7th (m7)
Dominant 7th (7)
Half-Diminished (m7♭5)
Diminished 7th (dim7)
Minor Major 7th (mMaj7)
Dominant 7th Suspended 4th (7sus4)
Major 7th (#5) & Major 7th (♭5)
Dominant 7th (#5) & Dominant 7th (♭5)
Major 6th (Maj6) & Minor 6th (m6)
Why You Need This Guide?
✅ Expand your fretboard knowledge
✅ Improve your improvisation skills
✅ Enhance your compositions with rich harmonic vocabulary
✅ Develop fluidity in playing across multiple octaves
How to Create Arpeggio Patterns (Scala Perpetua)
Scala Perpetua is your ultimate guide to mastering arpeggios and scales, designed for guitarists who want to unlock fluidity, precision, and musicality in their playing.
This comprehensive PDF includes:
✅ Step-by-step exercises for creating triadic and 7th arpeggio patterns
✅ Techniques for using arpeggios in chord progressions and song mapping
✅ Advanced superimposition concepts to enhance your improvisation skills
✅ Practical applications with clear diagrams and notation
Whether you’re a beginner aiming to build solid technical foundations or an advanced player refining your phrasing and speed, Scala Perpetua is the perfect tool to elevate your musicianship.
Music with no Shortcuts
Music With No Shortcut is the ultimate guide for guitarists who want a deep and structured approach to music theory, technique, and application. Whether you're a beginner or an advanced player, this book takes you step by step through the fundamentals and beyond, helping you develop a complete understanding of the fretboard and musical concepts.
What’s Inside?
🎸 Intervals & Fretboard Mastery – Understand how notes and distances shape music.🎸 Chords & Voicings – Learn triads, drop-2 & drop-3 chords, shell chords, and extensions.
🎸 Scales & Arpeggios – Develop fluency with essential and advanced patterns.
🎸 Keys & Modes – Explore major, minor, harmonic/melodic minor, and Greek modes.
🎸 Chord Progressions & Composition – Create musical arrangements with confidence.🎸 Chord Melody & Soloing – Learn to craft beautiful, harmonized guitar lines.
This method is designed for guitarists who want real progress—no gimmicks, no shortcuts, just solid musical understanding and application. If you want to play with confidence, improvise effortlessly, and build a deep connection with your instrument, Music With No Shortcuts is the perfect resource.
For a detailed overview of my Music With No Shortcuts method, including a full description and information about my support, click here or use the menu icon.


Comments