

Every Chord You Should Learn in Order
- Rodrigo Moreira
- Apr 29, 2025
- 30 min read
Updated: Jun 3, 2025
TABLE OF CONTENTS (Click to jump)b |
Every Chord You Should Learn in Order (Introduction)
Hey everyone, Rodrigo here again!
In today’s lesson, I want to share my personal approach to teaching guitar—specifically how I help students start playing chords and songs faster than they ever expected. This method is the result of 15 years of hands-on teaching experience with students of all ages. Over the years, I’ve paid close attention to what works, what doesn’t, and how to simplify the process so it feels less overwhelming and way more fun.
My goal has always been to break things down into super small, manageable steps. Most beginners can learn a few basic chords like Em, E, and Am—but the real challenge is moving from one chord to another smoothly. That’s where most people get stuck and frustrated. So, I created a series of progressive exercises that focus on chord sequences commonly used in popular music. These exercises are designed to gradually build up your ability to switch chords using minimal finger movement. Step by step, we go from simple transitions to more complex ones.
This lesson is all about helping complete beginners go beyond just a few chords—and get you playing real songs. But before we dive in, I want to show you a quick example.
Meet Ronald—he’s 65, recently retired, and decided to finally learn guitar. The video below was recorded after just seven lessons (less than two months!) using the exact exercises I’m going to teach you here. Take a moment to check it out, and I’ll share a few important thoughts right after:
I chose Ronald for a reason. When I work with adult students, I often hear things like “I should’ve started earlier” or “I’m just not talented enough.” But let me tell you—none of that matters. Age, hand size, past experience—it doesn’t matter. Everyone can learn guitar with the right approach and a bit of consistent effort.
Now, a few quick notes about Ronald’s progress: being retired, he’s had more time to practice than most. That definitely helps. But even if you only have a few minutes a day, four times a week, you can make serious progress too. It’s all about structure and consistency.
If you’re just getting started, I also recommend checking out my post: How to Play Guitar: A Beginner’s Guide to Success! In that post, I go over essential tips to help you avoid frustration and develop solid technique from day one. One of the key ideas I talk about is something I call “Morgan’s mindset”—treating your guitar lessons like school assignments: steady practice, no rush, just showing up and doing the work. That mindset can make all the difference.
Ronald performed at an open mic just one month after this video. You might've noticed he’s still working on rhythm—especially while singing—but that’s totally normal. When beginners sing and play at the same time, they often fall into one default strumming pattern. What matters most is that he’s out there doing it, learning in real time, and improving fast:
I hope Ronald’s journey inspires you to take your own first steps. And I hope you stick around—there’s a lot more good stuff coming soon!
One last thing before we get into the exercises: if you're not sure how to read chord diagrams yet, check out this post first: How to Read Guitar Chord Diagrams & Charts for Beginners. It'll help you make the most of what’s coming next.
Alright, let’s get started!
What Are the Easiest and Hardest Guitar Chords?
When you're just starting out on guitar, some chords will feel easier than others. The easiest chords are typically those that use just one or two fingers, with the fingers placed close together—requiring minimal stretching. Many beginners also hear that power chords (like E5, A5, and D5) are the easiest because they consist of only two notes. These three, in particular, can be played using just one finger and open strings, as shown in the images below.

However, there's a common misconception about power chords. While they only require one or two fingers to fret, the rest of your hand plays a critical role. To sound clean, you need to mute the other four strings you're not playing. Beginners often struggle with this muting technique, as well as the precision needed to strum only two specific strings. So, despite their reputation, power chords can be trickier than expected.
Even if you manage to play E5, A5, and D5, expanding your power chord vocabulary means developing finger strength—especially in your ring and pinky fingers. That takes time, and it limits beginners to only a few usable chords in the meantime.
So, what are the easiest chords to start with?
I recommend beginning with open chords. These chords are called “open” because they use several open strings (strings you don't have to fret), which makes them less demanding on your fingers and easier to learn. The most common open chords are:
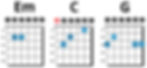
Em, E, Am, A, Dm, D, C, and G
Out of these, Em is usually the easiest. C and G are a bit more challenging due to the finger stretches involved. Check out the diagrams below to see how each one is played:
Now, let’s talk about the hardest chords: barre chords. Barre chords require you to press down five or six strings at once using your index finger—creating a "bar" across the fretboard—while the other fingers shape the rest of the chord. This technique demands strength, control, and precision, making it one of the biggest challenges for beginners.

The exercises in this post are designed to help you master what we call the basic chords—not just the eight essential open chords we introduced earlier, but a full set of around 31 practical chords. These include a mix of open-position shapes and simplified versions of more complex chords, giving you everything you need to start playing real songs right away.
These 31 chords are commonly used in popular music and have similar fingerings, which makes it easier to transition smoothly from one chord to another. They’ll also prepare you for more advanced techniques, including barre chords, without having to rely on a capo.
We'll dive deeper into this starting with our first example.
Here’s a fun fact about Ronald’s journey: so far, he hasn’t worked through all 18 upcoming exercises. He’s completed the first five, plus the 10th and 16th. You’ll have the chance to go even further!
18 Exercises to Master Guitar Chords: Exercise #01 (Em)
We'll use this first exercise to explain how the method works.
The E minor (Em) chord is one of the easiest chords to play on the guitar—most people can pick it up quickly. That said, younger students (especially kids under 10) might find it a bit tricky at first due to smaller hands struggling to reach the A and D strings. Still, it’s a great starting point.
The real challenge usually comes not from playing Em itself, but from switching between chords. A common scenario: a student learns how to play Em, but then struggles when asked to move to another open chord like D, Dm, C, or G. Each of these chords requires completely different fingerings, and that transition can be slow and frustrating for beginners.
This is often the point where students start to feel that guitar is "too hard" and consider giving up—before they’ve had the chance to build the muscle memory needed to move between chords smoothly.
To prevent that kind of frustration, I’ve created a series of chord sequences (also called chord progressions) that are widely used in popular music. These progressions are designed to connect chords that use similar finger shapes or require only small movements, making it much easier to develop fluid transitions.
Let’s get started with the first exercise. I’ll show you a diagram of each chord you’ll be playing and walk you through exactly where to place your fingers.

How to Play the Em Chord:
Place your middle finger on the 2nd fret of the A string and your pinky finger on the 2nd fret of the D string. These two fingers should be stacked vertically—one right above the other.
Strum all six strings. Then, play each string individually to check that every note rings clearly.
If one of the strings sounds muted, it’s likely that one of your fingers—usually the ring finger—is accidentally touching a neighboring string. To fix this, curve your fingers more by gently tilting your wrist forward. This will help keep your fingers arched and out of the way of other strings.

After playing the Em chord, keep your middle and pinky fingers in place, and add your index finger to the 1st fret of the G string. This chord doesn't require any muted strings, so if something sounds off, check to make sure your index or ring finger isn’t accidentally touching any unwanted strings.
Before moving on to the next chord, practice switching between Em and E, strumming each chord once. Only move forward when you can transition smoothly and quickly between the two.

To transition from an E major chord to E7, simply lift your ring finger while keeping your index and middle fingers in place. They should remain stationary and not move at all. Make sure all six strings ring out clearly—avoid unintentionally muting any of them. Practice switching between the three chords you’ve just learned using the following sequences:
Em → E → E7,
and then reverse the order:
E7 → E → Em.
Once you’re comfortable with those transitions, you’ll be ready to move on to the next chord.

To transition from the E7 chord to an Am chord, simply move your index and middle fingers down one string each. Keep them on the same frets—just shift your index finger to the B string and your middle finger to the D string. Once they’re in place, add your ring finger to the 2nd fret of the G string, directly below your middle finger.
The Am chord uses the same finger shape as the E major chord, but it’s positioned one string lower. However, unlike the E chords, you’ll need to avoid playing the low E string (6th string). The red circle with an "X" indicates that this string should be muted or avoided when strumming.
Strum the Am chord starting from the A string (5th string) down to the high E string (1st string).
Practice switching between the four chords you’ve learned using the following sequences:
Em → E → E7 → Am,
and then in reverse:
Am → E7 → E → Em
Once you’re comfortable with these transitions, you’ll be ready to learn the next chord.

The B7 chord is the final chord in this first exercise, and it can be a bit tricky because you need to avoid playing both the low and high E strings. Even if the B7 doesn’t sound perfect at first, I still recommend practicing the full chord sequence with it—this type of progression comes up often, so it’s worth getting comfortable with it early on.
When transitioning from the Am chord to the B7, use your ring finger as an “anchor.” Keep it in the same position while moving your index finger to the 1st fret of the D string and your middle finger to the 2nd fret of the A string.
At this point, muting the high E string can be challenging. Try gently touching it with the underside of your index finger to mute it. If you're not able to mute it yet, don't worry—just let the string ring out for now. It's more important to focus on learning the chord shape. Once you're confident with the fingering, muting will become easier.
Practice playing all five chords in the order you learned them. Repeat the full sequence over and over until switching between them becomes second nature:
Em → E → E7 → Am → B7 → Em → E → E7 → Am → B7 → Em → E → E7 → Am → B7 → Em → E → E7 → Am → B7 → ...
Once you’ve built up the muscle memory to play the full sequence smoothly, try creating variations by removing one or two chords. Here are a few examples:
Removing the E chord:
Em → E7 → Am → B7 → Em → E7 → Am → B7 → ...
Removing both E and E7:
Em → Am → B7 → Em → Am → B7 → ...
Removing Em:
E → E7 → Am → B7 → E → E7 → Am → B7 → ...
Removing Em and E:
E7 → Am → B7 → E7 → Am → B7 → ...
Removing E, E7, and B7:
Em → Am → Em → Am → Em → Am → ...
Experiment with as many combinations as you can think of. If you’ve practiced the full sequence enough, the variations will feel much easier and help reinforce your muscle memory even further.
Moving Forward
All of the upcoming chord exercises should be practiced the same way. First, learn the full sequence of chords in the given order. Practice them repeatedly to build muscle memory and help your brain lock in the chord shapes and transitions. Once you're comfortable with the sequence, begin experimenting with variations to challenge your ability to switch between chords with more diverse fingerings.
This first exercise is the easiest in the series, while the 18th is the most challenging. That said, opinions vary when it comes to the difficulty of the other 16 exercises—what feels easy for one student might be tricky for another. Feel free to practice the exercises in any order that works best for you, but please make sure to start with the first one and avoid jumping ahead to the final exercise until you feel confident with everything that comes before it.
Personally, I chose this specific order because starting with the 4th exercise, you can begin connecting new material with the first few exercises. This opens the door for more creative and flexible practice.
Good luck—and enjoy the process!
18 Exercises to Master Guitar Chords: Exercise #02 (D)

To play the D major chord, place your index finger on the 2nd fret of the G string, your ring finger on the 3rd fret of the B string, and your middle finger on the 2nd fret of the high E string (1st string). Be sure to avoid strumming the low E and A strings. When learning this chord, many students accidentally mute the high E string by letting their ring finger touch it. To get a clear, ringing tone, make sure your fingers are properly curved and try shifting your wrist slightly forward to improve your finger angle.

To transition from a D major chord to Dsus4, simply add your pinky finger to the 3rd fret of the high E string, keeping all your other fingers in the same position as before. While the image above doesn’t show the middle finger, you can leave it on the 2nd fret of the high E string—it won’t affect the sound and can actually make switching between chords quicker and smoother.
Practice going back and forth between the two shapes until it feels natural. All you're doing is adding and removing your pinky:
D → Dsus4,
then back again:
Dsus4 → D

This chord can be interpreted as either Gadd9 or Dsus4/G, but to keep things simple, we’ll refer to it as Gadd9. To transition from Dsus4 to Gadd9, just move your middle finger to the 3rd fret of the low E string, while keeping all your other fingers in the same position as the previous chord.
You might notice the A string is typically muted in this shape—don’t worry! When you place your middle finger on the low E string, it will naturally rest against the A string, muting it without any extra effort.
Practice switching back and forth between the three chords until it feels smooth and comfortable:
D → Dsus4 → Gadd9,
then back:
Gadd9 → Dsus4 → D

To transition from Gadd9 to G major, simply move your index finger to the 2nd fret of the A string. Everything else stays the same, and this time, all six strings should be strummed!
Practice switching back and forth between the four chords until the transitions feel natural:
D → Dsus4 → Gadd9 → G,
then reverse the order:
G → Gadd9 → Dsus4 → D

To transition from G major to Cadd9, simply shift your middle and index fingers down one string each, while keeping your ring and pinky fingers in the same position. Be sure to avoid strumming the low E string.
Practice moving through the full progression until each transition feels smooth and natural:
D → Dsus4 → Gadd9 → G → Cadd9,
then reverse:
Cadd9 → G → Gadd9 → Dsus4 → D
Once you’ve developed the muscle memory to play the full sequence smoothly, try mixing it up by removing one or two chords to create your own variations. Here are a few examples:
Removing the Dsus4 chord:
D → Gadd9 → G → Cadd9 → D → Gadd9 → G → Cadd9 → ...
Removing both Dsus4 and Gadd9:
D → G → Cadd9 → D → G → Cadd9 → ...
Removing Cadd9:
D → Dsus4 → Gadd9 → G → D → Dsus4 → Gadd9 → G → ...
Removing D and G:
Dsus4 → Gadd9 → Cadd9 → Dsus4 → Gadd9 → Cadd9 → ...
Removing Dsus4, Gadd9, and Cadd9:
D → G → D → G → D → G → ...
The main goal of this exercise is to master the transition between G major and D major. Make sure you’re comfortable with it before moving on to the next exercise.
18 Exercises to Master Guitar Chords: Exercise #03 (Dm)
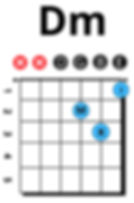
The third exercise is a variation of the second one. This time, instead of starting with D major, we’ll begin with D minor.

To play the D minor chord, place your middle finger on the 2nd fret of the G string, your ring finger on the 3rd fret of the B string, and your index finger on the 1st fret of the high E string. Avoid strumming the low E and A strings.

To transition from D minor to Dsus4, simply add your pinky finger to the 3rd fret of the high E string—no need to move any other fingers. It works the same way as in the previous exercise.
You may have noticed that we're using a different fingering for Dsus4 compared to before. That’s completely normal—there are often multiple ways to finger the same chord, and the best choice depends on the context, especially which chord you're coming from or moving to.
As before, make sure to avoid strumming the low E and A strings.
Practice going back and forth between the two shapes until it feels natural. All you're doing is adding and removing your pinky:
Dm → Dsus4,
then back again:
Dsus4 → Dm
This time, instead of playing the Gadd9 chord, you'll transition directly from Dsus4 to G major. To do this, keep your ring and pinky fingers in the same position, then move your middle finger to the 3rd fret of the low E string and your index finger to the 2nd fret of the A string.
Practice moving between the two shapes until the transition feels smooth and natural:
Dm → Dsus4 → G,
then back:
G → Dsus4 → Dm
To transition from G major to Cadd9, simply shift your middle and index fingers down one string each, while keeping your ring and pinky fingers in the same position. Be sure to avoid strumming the low E string.
Practice moving through the full progression until each transition feels smooth and natural:
Dm → Dsus4 → G → Cadd9,
then reverse:
Cadd9 → G → Dsus4 → Dm
Once you’ve developed the muscle memory to play the full sequence smoothly, try mixing it up by removing one or two chords to create your own variations. Here are a few examples:
Removing the Dsus4 chord:
Dm → G → Cadd9 → Dm → G → Cadd9 → ...
Removing both Dsus4 and Cadd9:
Dm → G → Dm → G → Dm → G → ...
Removing both Dsus4 and G:
Dm → Cadd9 → Dm → Cadd9 → Dm → Cadd9 → ...
The main goal of this exercise is to master the transition between G major and D minor. Make sure you’re comfortable with it before moving on to the next exercise.
18 Exercises to Master Guitar Chords: Exercise #04 (Am)

You already learned this chord in the first exercise! To play the A minor chord, place your middle finger on the 2nd fret of the D string, your ring finger on the 2nd fret of the G string, and your index finger on the 1st fret of the B string. Make sure to avoid playing the low E string.

To transition from the A minor chord to the C major chord, simply move your ring finger to the 3rd fret of the A string—leave your other fingers exactly where they are.
Practice switching between the two shapes until the movement feels smooth and natural.
Am → C,
then back:
C → Am

To switch from the C major chord to the C7 chord, simply add your pinky to the 3rd fret of the G string—keep all your other fingers in place.
Practice moving smoothly between all three shapes:
Am → C → C7,
Then reverse the order:
C7 → C → Am
Repeat the sequence until each transition feels effortless and natural.

To transition from the C7 chord to the F/C chord, move your middle finger down one string and your pinky up one string. This chord can be a bit tricky—mainly because you’ll need to mute the high E string. You can do this by gently touching it with your index finger.
Just like I mentioned when we learned the B7 chord: even if it doesn’t sound perfect at first, keep playing the exercises. The more familiar you become with the chord shapes, the more you’ll start noticing and correcting little details—like muting unwanted strings—without even thinking about it.
Practice moving smoothly between all the chord shapes:
Am → C → C7 → F/C
Then reverse the sequence:
F/C → C7 → C → Am
Repeat this cycle until each transition feels effortless and natural.
Am → C → C7 → F/C → Am → C → C7 → F/C → Am → C → C7 → F/C → ...
Once you’ve developed the muscle memory to play the full sequence smoothly, try mixing it up by removing one or two chords to create your own variations. Here are a few examples:
Removing the C chord:
Am → C7 → F/C → Am → C7 → F/C → Am → C7 → F/C → ...
Removing both C and C7:
Am → F/C → Am → F/C → Am → F/C → ...
Removing both Am and C7:
C → F/C → C → F/C → C → F/C → ...
The main goal of this exercise is to master the transitions between A minor and C major, as well as between C major and F/C. Make sure you’re comfortable with it before moving on to the next exercise.
18 Exercises to Master Guitar Chords: Exercise #05 (C)
The fifth exercise is a variation of the fourth, but this time we’ll start from the C major chord instead of A minor.
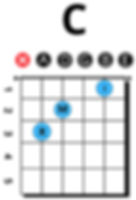
Place your ring finger on the 3rd fret of the A string, middle finger on the 2nd fret of the D string, and index finger on the 1st fret of the B string. Avoid playing the low E string.

To transition from C major to Cmaj7 simply lift your index finger while keeping your other fingers in place. Continue to avoid playing the low E string.
To transition from Cmaj7 to C7 place your index finger back on the 1st fret of the B string and add your pinky to the 3rd fret of the G string. Keep your ring and middle fingers where they are. Avoid playing the low E string.
To transition from the C7 chord to the F/C chord, move your middle finger down one string and your pinky up one string. This chord can be a bit tricky—mainly because you’ll need to mute the high E string. You can do this by gently touching it with your index finger.
Practice moving smoothly between all the chord shapes:
C → Cmaj7 → C7 → F/C
Then reverse the sequence:
F/C → C7 → Cmaj7 → C
Repeat this cycle until each transition feels effortless and natural.
C → Cmaj7 → C7 → F/C → C → Cmaj7 → C7 → F/C → C → Cmaj7 → C7 → F/C → ...
Once you’ve developed the muscle memory to play the full sequence smoothly, try mixing it up by removing one or two chords to create your own variations. Here are a few examples:
Removing the C chord:
Cmaj7 → C7 → F/C → Cmaj7 → C7 → F/C → Cmaj7 → C7 → F/C → ...
Removing both C and C7:
Cmaj7 → F/C → Cmaj7 → F/C → Cmaj7 → F/C → ...
Removing both Cmaj7 and F/C:
C → C7 → C → C7 → C → → C7 → ...
It’s important to learn all the transitions in this exercise.
18 Exercises to Master Guitar Chords: Exercise #06 (Mix it all up)
By now, you might’ve noticed that some exercises are designed to connect seamlessly—meaning the last chord of one leads naturally into the first chord of the next.
Take the first exercise, for example:
Em → E → E7 → Am → B7
This can be connected to the third exercise:
Am → C → C7 → F/C
To make the transition smoother, we’ll drop the B7 chord. The result is:
Em → E → E7 → Am → C → C7 → F/C
As before, practice this extended progression both forward and backward. Then, experiment by removing chords to create shorter variations.
The main goal here is to get comfortable switching between Em and Am, Em and C, and Em and F/C.
18 Exercises to Master Guitar Chords: Exercise #07 (Mix it all up again)
In my experience, students generally have no trouble switching to E minor from other chords. The challenge usually lies in switching from E minor to certain chords.
With that in mind, I’m going to combine the second, first, and third chord progressions into one extended exercise:
D → Dsus4 → Gadd9 → G → Em → E → E7 → Am → C → C7 → F/C
Practice this full progression back and forth until it feels comfortable. Then, begin shortening it by removing chords while maintaining smooth transitions.
The main focus of this exercise is improving your switch from G major to E minor. However, it’s also highly recommended to isolate and practice these two common sequences:
G → Em → Am → D
and
G → Em → C → D
Remember, you can also start these exercises with a Dm chord instead of D major.
Moving Forward
If you've made it through all the exercises up to this point, congratulations — you now have the ability to play countless songs. While you'll still need to continue developing your right-hand technique, you've already tackled the hardest part: learning the essential chords.
Keep in mind that since you've mastered the most fundamental chord shapes, every new exercise from here on can be combined with what you've already learned. It's now up to you to get creative and explore new musical ideas.
18 Exercises to Master Guitar Chords: Exercise #08 (G7)

Place your ring finger on the 3rd fret of the A string, middle finger on the 2nd fret of the D string, and index finger on the 1st fret of the B string. Avoid playing the low E string.

To switch from a C major chord to a Gsus4 chord, keep your index finger in place and move your middle and ring fingers one string higher.

To switch from a Gsus4 chord to a G7 chord, do the opposite: keep your middle and ring fingers in place and move your index finger down one string.
There are only three chord combinations you need to practice with these chord shapes:
C → Gsus4 → G7
G7 → Gsus4 → C
C → G7 → C
18 Exercises to Master Guitar Chords: Exercise #09 (Tom Petty, Pink Floyd, Green Day, Taylor Swift)
The following chord combination has been a favorite among songwriters for decades — and it continues to be used across generations. You’ve probably heard these chords arranged in different ways or transposed to other keys with a capo, which can make them sound slightly different. Still, this progression remains one of the most commonly played in popular music.
To play the G major chord, place your middle finger on the 3rd fret of the low E string, your index finger on the 2nd fret of the A string, your ring finger on the 3rd fret of the B string, and your pinky on the 3rd fret of the high E string. For all the chords in this exercise, your ring and pinky fingers will remain in the same position.

To switch from the G major chord to Em7, simply move your middle finger to the 2nd fret of the D string, keeping all your other fingers in place.
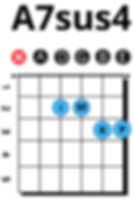
To switch from Em7 to A7sus4, simply move your index and middle fingers down one string, while keeping your ring and pinky fingers in the same position.
To switch from A7sus4 to Dsus4, simply lift your index finger and keep the other fingers in place.
Practice the following chord progression repeatedly:
G → Em7 → A7sus4 → Dsus4 → G → Em7 → A7sus4 → Dsus4 → G → Em7 → A7sus4 → Dsus4 → ...
Once you're comfortable, try playing the same progression but replace the A7sus4 with Cadd9. At this point, that switch should feel easy:
G → Em7 → Cadd9 → Dsus4 → G → Em7 → Cadd9 → Dsus4 → G → Em7 → Cadd9 → Dsus4 → ...
While the order of these chords can vary, they form the foundation of many popular songs. Here are just a few examples:
Free Fallin’ – Tom Petty
Wish You Were Here – Pink Floyd
Good Riddance (Time of Your Life) – Green Day
Lover – Taylor Swift
Learn these songs, and you’ll open up even more possibilities for what you can play.
18 Exercises to Master Guitar Chords: Exercise #10 (A)

To play an A major chord, place your index finger on the 2nd fret of the D string, your middle finger on the 2nd fret of the G string, and your ring finger on the 2nd fret of the B string. Be sure to avoid playing the low E string.
Many beginners find this chord challenging at first because it feels awkward to fit all three fingers on the same fret. However, the fingers don't need to be stacked directly on top of each other — they should be slightly staggered in a diagonal line. Position your index finger toward the beginning of the second fret, your ring finger closer to the end of the fret, and your middle finger roughly centered. With a little practice, this shape will start to feel natural.

To transition from the A major chord to the Amaj7 chord, keep your ring finger in place while briefly lifting your index and middle fingers. Then, reposition your index finger on the 1st fret of the G string and your middle finger on the 2nd fret of the D string. Make sure to continue avoiding the low E string.

To transition from the Amaj7 chord to the A7 chord, simply lift your index finger while keeping your middle and ring fingers in place. Be sure to continue avoiding the low E string.

To play the Dmaj7 chord, use the exact same shape you used for the A major chord, but shift all your fingers down one string. Place your index finger on the 2nd fret of the G string, your middle finger on the 2nd fret of the B string, and your ring finger on the 2nd fret of the high E string. Make sure to avoid playing both the low E and A strings.

To transition from the Dmaj7 chord to the D7 chord, keep your ring finger in place while briefly lifting your index and middle fingers. Then, reposition your index finger on the 1st fret of the B string and your middle finger on the 2nd fret of the G string. Make sure to continue avoiding both the low E and A strings.
Practice this full progression back and forth until it feels comfortable. Then, begin shortening it by removing chords while maintaining smooth transitions.
A → Amaj7→ A7→ Dmaj7 → D7→ A → Amaj7→ A7→ Dmaj7 → D7→ ...
By now, I'm confident you understand how to practice the exercises, so I'll begin moving a bit faster.
18 Exercises to Master Guitar Chords: Exercise #11 (D embellishments)
By "embellishments," I mean that whenever we have a D major chord in a song, we can blend it with Dsus2 and Dsus4 chords to create a more melodic line in the higher notes and make the progression sound more interesting.

To play the Dsus2 chord, you simply take the D major shape we learned earlier and remove the middle finger. Place your index finger on the 2nd fret of the G string and your ring finger on the 3rd fret of the B string.
To transition from the Dsus2 chord to the D major chord, simply place your middle finger on the 2nd fret of the high E string while keeping the other fingers in the same position.
To transition from the D major chord to the Dsus4 chord, simply place your pinky on the 3rd fret of the high E string while keeping all your other fingers in the same position — including your middle finger, which stays on the 2nd fret of the high E string.
For this exercise, simply play the chord progressions back and forth until they feel comfortable:
Dsus2 → D → Dsus4
and
Dsus4 → D → Dsus2
To play the progressions in reverse, lift your pinky finger when switching from Dsus4 to D major, and then lift your middle finger when switching from D major to Dsus2.
18 Exercises to Master Guitar Chords: Exercise #12 (Dm embellishments)
The twelfth exercise is a variation of the eleventh. However, since we’re starting with the Dm chord, the fingerings for each chord will be slightly different — though the basic idea remains the same.

This time, to play the Dsus2 chord, place your middle finger on the 2nd fret of the G string and your ring finger on the 3rd fret of the B string.
To transition from the Dsus2 chord to the Dm chord, simply place your index finger on the 1st fret of the high E string while keeping all the other fingers in the same position.
To transition from the Dm chord to the Dsus4 chord, simply place your pinky on the 3rd fret of the high E string while keeping all your other fingers in the same position — including your index finger, which stays on the 1st fret of the high E string.
For this exercise, simply play the chord progressions back and forth until they feel comfortable:
Dsus2 → Dm → Dsus4
and
Dsus4 → Dm → Dsus2
To play the progressions in reverse, lift your pinky finger when switching from Dsus4 to Dm, and then lift your index finger when switching from Dm to Dsus2.
You should be able to revisit all the exercises that use the D major and D minor chords and add these variations to them.
18 Exercises to Master Guitar Chords: Exercise #13 (A embellishments)

To play the Asus2 chord, simply place your index finger on the 2nd fret of the D string and your middle finger on the 2nd fret of the G string.

To transition from the Asus2 chord to the A major chord, simply place your ring finger on the 2nd fret of the B string while keeping all the other fingers in the same position.

To transition from the A major chord to the Asus4 chord, simply slide your ring finger to the 3rd fret of the B string while keeping all the other fingers in the same position.
For this exercise, simply play the chord progressions back and forth until they feel comfortable:
Asus2 → A → Asus4
and
Asus4 → A → Asus2
18 Exercises to Master Guitar Chords: Exercise #14 (Am embellishments)
The fourteenth exercise is a variation of the thirteenth. However, since we’re starting with the Am chord, the fingerings for each chord will be slightly different — though the basic idea remains the same.

To play the Asus2 chord, simply place your middle finger on the 2nd fret of the D string and your ring finger on the 2nd fret of the G string.

To transition from the Asus2 chord to the Am chord, simply place your index finger on the 1st fret of the B string while keeping all the other fingers in the same position.

To transition from the Am chord to the Asus4 chord, simply add your pinky finger to the 3rd fret of the B string while keeping all the other fingers in the same position.
For this exercise, simply play the chord progressions back and forth until they feel comfortable:
Asus2 → Am → Asus4
and
Asus4 → Am → Asus2
18 Exercises to Master Guitar Chords: Exercise #15 (C embellishments)
The C embellishments are a little different from the ones we just worked on, because instead of changing the highest notes, we'll be moving one of the middle notes.

To play the Csus2 chord, simply place your ring finger on the 3rd fret of the A string and your index finger on the 1st fret of the B string. Make sure to avoid playing both the low E and high E strings.
To transition from the Csus2 chord to the C chord, simply place your middle finger on the 2nd fret of the D string while keeping all the other fingers in the same position.
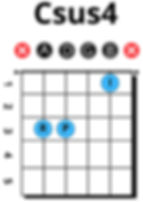
To transition from the C chord to the Csus4 chord, simply add your pinky finger to the 3rd fret of the D string while keeping all the other fingers in the same position.
For this exercise, simply play the chord progressions back and forth until they feel comfortable:
Csus2 → C → Csus4
and
Csus4 → C → Csus2
18 Exercises to Master Guitar Chords: Exercise #16 (Bbm/F)
Unlike the previous exercises, I’m going to tell you the goal of this one right from the start. The purpose of this exercise is to practice switching between the F/C chord we learned earlier and the Bbm/F chord. These two chords have exactly the same shape and fingering—the only difference is that, when transitioning from F/C to Bbm/F, you move all your fingers down by one string.
One important detail to keep in mind: while the F/C chord requires you to mute or avoid both the low and high E strings, the Bbm/F chord requires you to mute or avoid the low E and A strings instead.

To play the Bbm/F chord, place your ring finger on the 3rd fret of the D string, your pinky on the 3rd fret of the G string, your middle finger on the 2nd fret of the B string, and your index finger on the 1st fret of the high E string. Be sure to mute or avoid playing the low E and A strings.
This exercise has its own chord progression, but before moving on, take some time to practice transitioning between F/C and Bbm/F. Focus on getting the movement smooth and consistent:
F/C → Bbm/F → F/C → Bbm/F → ...
Once you're comfortable with that, we’ll dive into the full progression—starting with Bbm/F as the first chord.
To transition from the Bbm/F chord to the Dm chord, keep your index finger where it is. Move your middle finger to the 2nd fret of the G string and your ring finger to the 3rd fret of the B string. You won’t need your pinky for this chord. As before, continue to avoid playing the low E and A strings.
After transitioning from Bbm/F to Dm, we'll move into a chord progression we've practiced before (kind of): Bbm/F → Dm → G7 → C7 → F/C ...
and practice it over and over.
18 Exercises to Master Guitar Chords: Exercise #17 (D/F#)
The final chord you need to learn is the D/F#. It's based on the familiar D major shape we've been practicing, with one key difference: you'll use your thumb to fret the 2nd fret of the low E string. To do this, bring your thumb around from behind the neck, just as shown in the chord diagram below. In the diagram, "T" indicates the thumb placement.
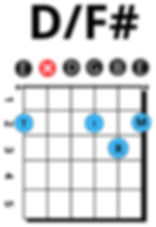
When you place your thumb on the low E string, try to let it lightly touch the A string to mute it. This technique isn’t meant to be easy—it’ll take time and practice to master. Be patient with yourself and allow your body to develop the muscle memory needed.
There are two main reasons to learn this chord. First, the D/F# is commonly used as a transition between the G and Em chords. Because of this, the following chord progressions will be an important exercise to practice:
G → D/F# → Em → Am → ...
G → D/F# → Em → C → ...
When working on the transition from G major to D/F#, start by forming the D major shape first, and then add your thumb (T) to the low E string. Don’t try to do everything at once. If you’re still struggling to move from G to D, try inserting a Dsus4 chord before the D. Breaking it down into smaller steps, the exercise would look like this:
G → Dsus4 → D → D/F# → Em → Am → ...
G → Dsus4 → D → D/F# → Em → C → ...
The second reason is that by learning this technique, you’ll gain the ability to mute the low E string—or even both the low E and A strings—whenever needed. Why is this important? Because many of the chords you've just learned require you to avoid one or two strings when strumming. If you master muting instead of constantly thinking about which strings to avoid, strumming will become much easier and more natural. You’ll be able to focus on your rhythm and flow without worrying about accidentally hitting the wrong strings. This technique is a major milestone in your technical development. And just like before, remember: it’s not easy and it will take time, but with practice and patience, you can absolutely master it—just like anyone else can.
18 Exercises to Master Guitar Chords: Exercise #18 (Mix it all up one last time)
The final exercise is a combination of everything we've practiced so far. Fortunately, most of the shapes are familiar, and even the trickier transitions should become clear with a bit of practice. By mastering this exercise — along with the next topic I'll introduce — you'll have the tools to play any song you want. At least when it comes to knowing the chords; you'll still need to keep working on your rhythm skills.
Em → E → E7 → Am → A → Amaj7 → A7 → Dmaj7 → D7 → G → Gsus4 → G7 → C → Cmaj7 → C7 → F/C → Bbm7 → B7 → ...
Barre Chords: You already learned them (Well, kind of)
If you've mastered the F/C and Bbm/F shapes, you'll be ready to play songs that use barre chords — no capo needed. The truth is, the F/C is actually a simplified version of the full F major barre chord. As you can see in the image below, instead of pressing down all the strings, we're focusing only on the middle notes and muting the highest and lowest strings. This approach lets you play barre-style chords without having to fully barre across the frets.

The same idea applies to the Bbm/F — it's a simplified version of the full Bbm chord.

I’m not getting into the music theory behind why this works just yet, but here’s the important part: you can use the F/C shape to play any major barre chord, and the Bbm/F shape to play any minor barre chord. These are called "movable shapes," and all you have to do is slide them up or down the fretboard to reach the chords you need. Take a look at the chart below:

To keep the chart clear and uncluttered, I left out the "/C" and "/F" from each chord name — but don’t worry, it doesn’t change anything.
Thanks for reading this far!
Rodrigo Moreira